Thursday, June 30, 2011

A Sweet Apron


I made four aprons for some graduating seniors girls from church.  Since this would probably be the first apron they'd own, I wanted it to be cute enough they would want to wear it.  I used Meadowsweet fabric by Sandi Henderson and added a ruffle and a gathered pocket.  I used some binding to trim the pocket.   I came up with my own pattern to get just what I wanted.  I'm happy with how they turned out.


I had to make the pocket puff out a little so a hand could fit into it.  I think it gives it extra charm. 


Now if I could only teach the boys in the house (including hubby who took this one) how to take a picture without cutting off a head or something else.


By the way we have this shrub/tree plant that has these pretty flowers, does anyone know what the plant is called?


Monday, June 27, 2011

Kid's Artwork

(Click on Photos to Enlarge)
My children helped me fill in the new frames in the living room.  We did some watercolor paintings together and they did wonderful artwork.


I've had my eye on a couple Etsy artist, who paint trees with dots, check them out Once Upon a Paper and Jellybeans.  I knew I could give it a try myself.  I love the colors.  I know I'm a copycat, but it was fun to do and more personal because I did it.


 I wanted to redo the the piano bench with my new updated living room, so I asked my boys what fabric they wanted.  They chose the zebra and I told them, "I don't think so".  But after a while, I actually kind of liked it.  I figured sitting on the zebra might encourage more piano practice (notice the "tail" on the right).  I think it actually might be working.


Here is a shot of everything together.  I love it, it's all so fun!!!


Thursday, June 16, 2011

Pillows and Frames


The picture frames are hung and the pillows are sewn.  Now I need to fill the frames with the kid's artwork and such.  I bought the oval frames at secondhand stores for the kids' silhouettes, I think they turned out cute.  The other frames I bought at IKEA, Ross, and one that I had on hand.  At first I didn't know if I should do the all the frames black, or white, but then I saw collages with different types and I think that worked out best for me.


Using the paper templates for the frames made organizing and hanging up the frames a breeze.  I'm happy with the arrangement.


For the pillows I ended up using an invisible zipper.  The first one I used a pocket method, but since a few of the pillows have different fabrics on the back, I wanted to be able to flip them if I wanted.  I stumbled across a pile of free decorators fabric samples last fall that I used for most of the pillows, you can't beat free.  I bought the pillow inserts at IKEA, which were inexpensive .  The pillow inserts were 20", but I wanted a smaller size, so I sewed the inserts smaller making the pillow more firm and to the size I wanted.  It actually worked out perfectly.

Tuesday, June 14, 2011

Do a Little Dance


There are some advantages of being the youngest of four boys.  You learn how to be COOL early on, and THINK you are cool too. 


And here are the boys who have taught Preston how to "shake your groove thing" at a Mariner's game.

Monday, June 13, 2011

Decorating My Living Room

Now that I have a neutral canvas to work with, it's time to bring color in.  I cut out paper the size of my frames and placed them on the wall in a way that I like.  My assistant Preston took the photo for me while I held up the shelf, so sorry for the backside shot.  Anyways, this method worked great for hanging up the picture frames.


Here are some of the fabrics I'm using for the pillows.  I love the bright cheery colors.  Right now I just love adding color into my decor.

Here are a couple pictures I got my inspiration from:


Saturday, June 11, 2011

Re-upholstered Settee/Sofa

 Out with the old, in with the new.

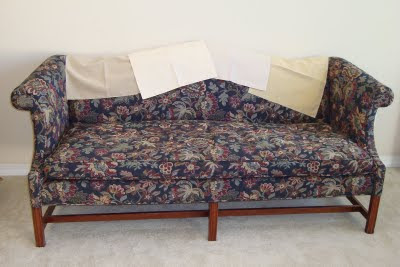
Remember this lovely sofa or settee I purchased on Craigslist last fall for $50?  Well after taking out a zillion staples, layer by layer, then stapling on new fabric, layer by layer (and yes, there was sweat and blood involved)...I'm Finally Finished!!!


Here is our new Beautiful sofa!  I used Crypton fabric, which is stain resistant and perfect for kids, but I'm not going to tell them that.  The color is called Bella Toast, a great neutral color so I can add some colorful throw pillows and never get tired of the color.


There were definitely some parts that were more difficult than others.  I had to do one of the curved arm pieces a few times, because the nails kept poking through.


 I sewed the cushion twice.  The first time the corners didn't align just right.  It took me all day to undo all the stitching, upholstery thread is tough.  Luckily, it looked right the second time because I don't know if I would of had the patience to do it a third time.


Since this was my first upholstery job, I learned a lot.  One thing that I've read, but would do differently is when you use the old fabric as a pattern for cutting out the new fabric, cut it a little bigger.  The reason is after the fabric is stapled on, some parts are trimmed up making it smaller, and if you don't have it perfectly positioned right it may not fit just right. 

 I've asked myself, "Would you do it again?", Yes, but not anytime soon.  I now have a custom sofa that I just love for less than $200.  I think it was worth it!